1、开启配置自定义顶部
{
 "window": {
 "navigationStyle":"custom"
 }
}
在app.json的文件window配置"navigationStyle": "custom"属性即可
2、自定义顶部计算原理
2.1 获取系统状态栏的高度和屏幕宽度
使用wx.getSystemInfo这个函数获取系统状态栏的高度和屏幕宽度。
2.2 获取右上角胶囊位置信息
使用wx.getMenuButtonBoundingClientRect()方法获取右上角胶囊位置信息。
关键问题在于自定义胶囊的上、下和左边距。
2.3 自定义顶部距离计算代码
app.js代码如下
App({
 // 小程序初始化
 onLaunch: function() {
 // 获取自定义顶部高度相关参数
 let capsuleObj = wx.getMenuButtonBoundingClientRect();
 // console.log("==胶囊信息==");
 // console.log(capsuleObj);

 wx.getSystemInfo({
 success: (res) => {
 // console.log("==获取系统信息==");
 // console.log(res)
 var statusBarHeight = res.statusBarHeight; //顶部状态栏高度

 this.globalData.capsuleObj = capsuleObj;
 this.globalData.titleHeight = statusBarHeight + capsuleObj.height + (capsuleObj.top - statusBarHeight) * 2;
 },
 failure() {
 }
 })
 },

 // 全局缓存
 globalData: {
 loginStatus: false,
 },
})
3、封装自定义顶部
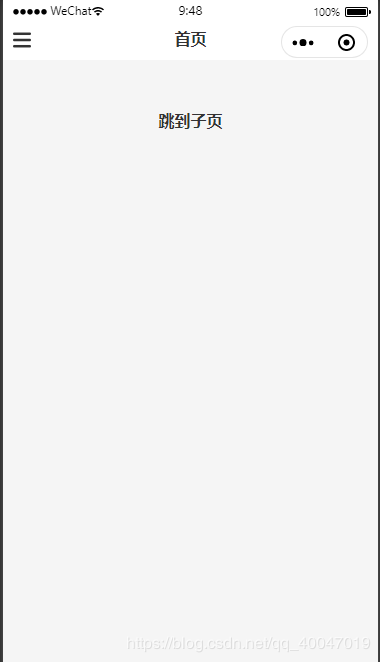
3.1效果图展示
3.2组件代码
index.wxml
<!--components/customHeader/index.wxml-->
<view class="customHeader_box" style="height:{{titleHeight}}px; background-color:{{bgColor}};">
 <!-- 菜单 -->
 <view wx:if="{{menuFlag}}" class="menu_box" style="height:{{capsuleObj.height}}px; top:{{capsuleObj.top}}px;">
 <view class="customIcon" bindtap="meunClick">
 <image src="/UploadFiles/2021-04-02/customMenu.png">

index.wxss


/* components/customHeader/index.wxss */

.customHeader_box {
 width: 100%;
 overflow: hidden;
 position: fixed;
 top: 0;
 left: 0;
 z-index: 99999;
}

.customIcon {
 flex: 1;
}

.customIcon image {
 width: 30rpx;
 height: 30rpx;
}

/* 菜单 */
.menu_box{
 text-align: center;
 box-sizing: border-box;
 overflow: hidden;
 position: absolute;
 left: 10px;
 z-index: 11;
 display: flex;
 justify-content: space-between;
 align-items: center;
}

.menu_box .customIcon image{
 width: 36rpx;
 height: 36rpx;
}

/* 返回+首页 */

.backHome_box {
 text-align: center;
 border: 1px solid #e5e5e5;
 border-radius: 20px;
 box-sizing: border-box;
 overflow: hidden;
 position: absolute;
 left: 10px;
 z-index: 11;
 display: flex;
 justify-content: space-between;
 align-items: center;
}

.backIcon {
 border-right: 1rpx solid #e5e5e5;
}

/* 标题 */

.customHeader_title {
 width: 100%;
 padding-left: 115px;
 padding-right: 115px;
 text-align: center;
 font-size: 32rpx;
 font-weight: bold;
 color: #333;
 text-overflow: ellipsis;
 box-sizing: border-box;
 overflow: hidden;
 white-space: nowrap;
 position: absolute;
 left: 0;
 z-index: 10;
}

/* 自定义顶部距离修正 */
.customWrap{
 width: 100%;
 position: relative;
 left: 0;
 z-index: 99998;
}


index.js


// components/customHeader/index.js
const app = getApp();

Component({
 /**
 * 组件的属性列表
 */
 properties: {
 customTitle: String,
 bgColor: {
 type: String,
 value: '#fff'
 },
 menuFlag: {
 type: Boolean,
 value: false
 },
 backHomeFlag: {
 type: Boolean,
 value: false
 },
 },

 /**
 * 组件的初始数据
 */
 data: {

 },

 attached: function() {
 this.setData({
 titleHeight: app.globalData.titleHeight,
 capsuleObj: app.globalData.capsuleObj
 })
 },

 options: {
 multipleSlots: true, //开启多slot
 },

 /**
 * 组件的方法列表
 */
 methods: {
 // 菜单
 meunClick: function () {
 wx.navigateTo({
 url: '/pages/menu/menu',
 })
 },

 // 返回
 backClick: function() {
 wx.navigateBack({
 delta: 1
 })
 },

 // 回首页
 homeClick: function() {
 wx.navigateTo({
 url: '/pages/index/index'
 })
 },
 }
})


index.json


{
 "component": true
}


4、组件使用方法
index.wxml


<!--pages/index/index.wxml-->

<!-- 自定义顶部 -->
<customHeader menuFlag customTitle="首页"></customHeader>

<view class="url">
	<navigator hover-class="none" url="../child/child">跳到子页</navigator>
</view>


ps:我这边封装了2个样式,meneFlag是菜单的。backHomeFlag是“返回+首页”样式的。
json配置


{
 "usingComponents": {
 "customHeader": "/components/customHeader/index"
 }
}


5、小结
此组件兼容性,可以兼容安卓、IOS、刘海屏,如果你们测试出来有新bug,可以在gitHub提出issues,帮助您解决。
链接在此:

微信小程序自定义顶部组件
免责声明:本站文章均来自网站采集或用户投稿,网站不提供任何软件下载或自行开发的软件!
如有用户或公司发现本站内容信息存在侵权行为,请邮件告知! 858582#qq.com
暂无“微信小程序自定义顶部组件customHeader的示例代码”评论...
稳了!魔兽国服回归的3条重磅消息!官宣时间再确认!
昨天有一位朋友在大神群里分享,自己亚服账号被封号之后居然弹出了国服的封号信息对话框。
这里面让他访问的是一个国服的战网网址,com.cn和后面的zh都非常明白地表明这就是国服战网。
而他在复制这个网址并且进行登录之后,确实是网易的网址,也就是我们熟悉的停服之后国服发布的暴雪游戏产品运营到期开放退款的说明。这是一件比较奇怪的事情,因为以前都没有出现这样的情况,现在突然提示跳转到国服战网的网址,是不是说明了简体中文客户端已经开始进行更新了呢?
更新动态
2026年02月17日
2026年02月17日
- 小骆驼-《草原狼2(蓝光CD)》[原抓WAV+CUE]
- 群星《欢迎来到我身边 电影原声专辑》[320K/MP3][105.02MB]
- 群星《欢迎来到我身边 电影原声专辑》[FLAC/分轨][480.9MB]
- 雷婷《梦里蓝天HQⅡ》 2023头版限量编号低速原抓[WAV+CUE][463M]
- 群星《2024好听新歌42》AI调整音效【WAV分轨】
- 王思雨-《思念陪着鸿雁飞》WAV
- 王思雨《喜马拉雅HQ》头版限量编号[WAV+CUE]
- 李健《无时无刻》[WAV+CUE][590M]
- 陈奕迅《酝酿》[WAV分轨][502M]
- 卓依婷《化蝶》2CD[WAV+CUE][1.1G]
- 群星《吉他王(黑胶CD)》[WAV+CUE]
- 齐秦《穿乐(穿越)》[WAV+CUE]
- 发烧珍品《数位CD音响测试-动向效果(九)》【WAV+CUE】
- 邝美云《邝美云精装歌集》[DSF][1.6G]
- 吕方《爱一回伤一回》[WAV+CUE][454M]


